Intro To Photography - Week 3

by - August 23, 2016

21/08/2016 - Week 3
ITP
Leanne Faye
Exercise 2b) ISO: 2b.1 & 2b.2
Exercise 2c) Shutter Speed

Lecture:

In today's lecture, Mr. Vinod started of by giving feedback for our e-portfolios. Then, we started out by having a short recap from last's weeks lecture on aperture. Then moving on to the lecture on shutter speed and ISO. The lecture was lengthy because we had to cover 2 components that affects exposure. It was clear for me to understand because I watched a few videos and read a few reading materials about shutter speed and ISO provided by Mr. Vinod on TIMeS few days before the lecture. During the lecture, I compared the notes I wrote down while watching the videos with what Mr. Vinod was saying so that I can keep up and not miss any important points.

Mr. Vinod asked us to refer or look at each other's blog and maybe learn a thing or two because we can get to know different styles of writing and learn each other's opinions and reflections. At the end of a blog posts, we can also add in a screengrab of our answer to the question in the forum.

After the lecture, we were given time to go out to do exercise 2c.1: to prove ISO affect exposure and exercise 2c.2: to prove ISO affect the quality of the image. When we came back, Mr. Vinod assigned us exercise 2b: show evidence that of shutter speed's ability can freeze fast moving objects or blur moving objects. This exercise is a take-home exercise as we have to shoot pictures of our fan using different shutter speed.


Exercise Instructions

Exercise 2b: ISO
Upon reading, viewing and discussing the material on ISO, we have come to agree that ISO effects exposure (Exercise 2c.1) and effects the quality of an image (Exercise 2c.2). 
Your in-class task today, requires you to prove that:
2b.1) ISO effects exposure
2b.2) ISO effects quality of image
2b) ISO (5%)
Marking Criteria: The student must capture the evidence of degradation of image as the ISO increases in sensitivity. The student also must produce evidence that ISO can directly affect exposure.
Learning goal: Students are able to prove that ISO effects exposure and is controls the sensitivity of the image sensor.
Learning outcome 1: Students will be able to use exposure settings (Aperture, Shutter Speed & ISO).
Learning outcome 3: Students will be able to distinguish a bad exposure from a good exposure.

Exercise 2c: Shutter Speed  
Directions: Choose a room that has good light and a ceiling fan. Keep the fan speed at 1 and capture images using shutter settings from 1/1000th of a second till 1’ of a second. Ensure the ISO and aperture adjusted according to what your camera light meter indicates as the correct exposure throughout the exposures. Repeat this exercise after changing the fan speed from 1 to 2 and the from 2 to 3 and so on.
All images must be in black and white, you can make the adjustment in the camera (if the feature is available) or make the adjustment later in photoshop (Image > Adjust > Black & White). Upload the screenshot of the document only and not the individual pictures for the shutter speed exercise.
2c) Shutter Speed (5%)
Marking Criteria: The student must capture the evidence of the Shutter’s ability to freeze fast moving objects and blur moving objects.
Learning goal: Students are able to prove that shutter speed effects exposure and is able to effect speed, in the captured image.
Learning outcome 1: Students will be able to use exposure settings (Aperture, Shutter Speed & ISO).
Learning outcome 3: Students will be able to distinguish a bad exposure from a good exposure.


All images must be in black and white, you can make the adjustment in the camera (if the feature is available) or make the adjustment later in Photoshop (Image > Adjust > Black & White)

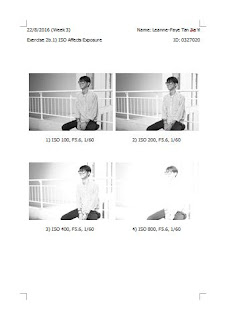
Exercise 2b.1) ISO Affects Exposure 

1)

ISO 100, F5.6, 1/60

2)

ISO 200, F5.6, 1/60

3)

ISO 400, F5.6, 1/60

4)


ISO 800, F5.6, 1/60

5)

ISO 1600, F5.6, 1/60

6)
ISO 3200, F5.6, 1/60

7)
ISO 6400, F5.6, 1/60

8)
ISO 12800, F5.6, 1/60


Exercise 2b.2) ISO Affects Quality of Image

ISO 100, F 5.6, 1/640

ISO 200, F5.6, 1/1250

ISO 400, F5.6, 1/2500

ISO 800, F5.6, 1/4000

Exercise 2c) Shutter Speed


Screenshots: 


Feedback:
Via Microsoft Excel
All info is as per the expected eportfolio format. The exercises are relatively accurate. You were unable to prove the theory ex 2b.2 for the reasons I offered (limited range of ISO and Good Image sensor). Your observations and findings must include the results of your exercises.

Recorded audio on-the-spot 
Lecture is good. You have summarised it decently. Exercise instructions are provided, very good, I like this part. You were able to prove that ISO affects exposure as the pictures are getting lighter and lighter it eventually become white. For exercise 2b.2, other than a slight difference in exposure because the sun goes in and out, there wasn't much of a difference. It is very difficult to identify. This can be because the quality of the image sensors these days are better, also because the range of your ISO is limited. These are the reasons why there is not much difference having said that, the theory though suggest that there is a quality difference in both but we were unable to see it. For the following exercise, save as PDF and click edit then take a snapshot because it is a bit unclear. Very good that you've actually talked about the exercise, that's what I want to know. I want to know what are your finding from that exercise and not only your experience. The rest parts are fine. 

Reflection:
Experience
This week's class was very helpful in clearing my confusion of the exposure of triangle. Mr. Vinod asked us to take our cameras out and look for where the image sensor is placed. There is an icon on all cameras that indicates where the image sensor is. The image sensor is located in the body of the camera. Mr. Vinod took out the lens of the camera and showed us where the image sensor is. Mr Vinod started giving us lecture on how ISO and Shutter Speed affects exposure and quality of image. We should never try to clean the image sensor on ourselves as we might scratch it and we must prevent dust from entering. Dusts is the enemy of the image sensor. 

After Mr. Vinod assigned us to do our exercise 2b.1 and 2b.2, we were left alone to figure out how to do it ourselves without Mr. Vinod's guidance. We discussed as a group on how to do it before taking the pictures, that way we can discuss each other's understanding from the lecture. I had a little confusion for exercise 2b.2 but luckily I remembered the video material provided by Mr. Vinod demonstrated how ISO affects image quality. Therefore, it was very important to watch or read the materials provided on TIMeS because it would really help or even benefit us. 

Observation
After reading the materials for the lecture on TIMeS, I realised that I understand better with visuals like images or videos. When reading the websites, I couldn't understand much but until I watched the videos. It is easier for me to grab information when someone demonstrates or verbally explains something to me. 

During the session, I notice the visible effect of ISO on pictures that affects exposure but as for the quality of image, there is just a slight difference with the grains and noise. After moving the pictures for exercise 2b.2 into my laptop, I used the picture with the smallest ISO and zoomed in at a distinct area and compared to the picture with the largest ISO, the difference were then even obvious. 

I realised that I learn more doing exercises, regardless in-class or take-home because I am putting what I learned into practice. 

Findings
After today's session, we completed the other two components of the exposure triangle which is ISO and shutter speed. I learned that the image sensor is sensitive to light and a higher ISO means the image sensor is more sensitive to light and if using a low ISO number, this means we need a lot of natural light. I understand that a lower number ISO results the least visible noise and a picture with high ISO number appears to be clearer but it is actually not and instead it actually increases the contrast of the picture. This illusion is created partially also because of the obvious grains. 

 I understand that shutter speed determines the amount of time lights stays in the image sensor. It is measured with seconds or fraction of seconds. If using a shutter speed lower than 1/60, it is advised to use a tripod because chances are it is going to turn out blur. 

When doing exercise 2c at home, I find it a bit tricky as we had to lie down for quite a long period of time to make sure that all pictures has the same angle. I also had to get it done fast before the natural lighting changes. As I take pictures of the ceiling fan, I had to note down the aperture, ISO and shutter speed of each picture so there was a lot to juggle when doing this exercise. 


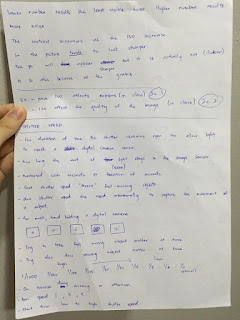
Notes I wrote while reading and watching the materials on TIMeS


Notes from the lecture on week 3


Questions on forum that we had to answer. 


My answers to the questions. 


Mr. Vinod's reply to my question 2 because my answer wasn't specific enough.

Further references: 

Reading material for shutter speedhttp://digital-photography-school.com/shutter-speed


Video material for shutter speed: 


Video material for how to use ISO: 


Other photographer's work:


Using a technique called long exposure whereby the camera's shutter speed is left open to expose an image. The results is the capture of both stationary and moving subject matter. The moving subject matter appears smudged or blur to create a sense of movement. 

Photographer - Sugianto 


You May Also Like

0 comments