
Intro to Photography - Week 2
8/7/2016 - Week 1
ITP
Leanne Faye (0327020)
Exercise 2a) Aperture: 2a.1 & 2a.2
ITP
Leanne Faye (0327020)
Exercise 2a) Aperture: 2a.1 & 2a.2
Lecture:
Today's lecture started of with Mr. Vinod sharing a few of
his favourite photographers that inspired him and some of his best works too.
Mr. Vinod explained about the measures of a good picture, a good picture leaves
you room for imagination. It can tell you a story and it can also be decisive.
A portrait is not only a straight shot but it can also include the environment
and create layers. There is so much more behind a nice picture than just a nice
background or model. Good editing is subtle and it enhances the image.
Today's exercise was to prove aperture affects exposure and
aperture controls depth of field. Exposure is affected by 3 components:
Aperture, Shutter Speed, ISO. In this exercise, we emphasise on aperture (
f-stop ). We were asked to do a practical exercise outside of our classrooms
using our cameras and tripods.
General Instructions:
2a) Aperture (in-class) Exercise:
Upon reading, viewing and discussing the material on
aperture, we have come to agree that aperture effects exposure (Exercise 2a.1)
and controls depth of field (Exercise 2a.2).
Your problem task today is to prove the theory as fact that
aperture does effect exposure (Exercise 2a.1) and control depth of field
(Exercise 2a.2) by devising a plan and acting on it.
When updating your ePortfolio ensure you describe your plan
before showcasing the evidence that proves the theory.
All images must be in black and white, you can make the
adjustment in the camera (if the feature is available) or make the adjustment
later in an approprite software or Photoshop (directions: Image > Adjust
> Black & White)
Marking Criteria
2a) Aperture (5%)
Marking Criteria: The student must capture the evidence of the Aperture’s influence in exposure using the various f-stops. The student must also capture the evidence of the Aperture’s influence on depth of field.
Marking Criteria: The student must capture the evidence of the Aperture’s influence in exposure using the various f-stops. The student must also capture the evidence of the Aperture’s influence on depth of field.
Learning goal: Students are able to prove that aperture
effects exposure and depth of field.
Learning outcome 1: Students will be able to use exposure settings (Aperture, Shutter Speed & ISO).
Learning outcome 3: Students will be able to distinguish a bad exposure from a good exposure.
Learning outcome 1: Students will be able to use exposure settings (Aperture, Shutter Speed & ISO).
Learning outcome 3: Students will be able to distinguish a bad exposure from a good exposure.
Exercise 2a.1: Aperture Affects Exposure

ISO 200, 1/80, F5.6
2)

ISO 200, 1/80, F8.0
3)

ISO 200, 1/80, F11
4)

ISO 200, 1/80, F16
5)

ISO 200, 1/80, F22
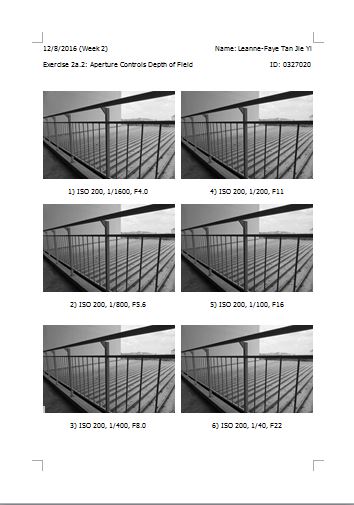
Exercise 2a.2: Aperture Controls Depth of Field
1)

ISO 200, 1/1600, F4.0
2)

ISO 200, 1/800, F5.6
3)

ISO 200, 1/400, F8.0
4)

ISO 200, 1/200, F11
5)

ISO 200, 1/100, F16
6)

ISO 200, 1/40, F22
Screenshots:

Feedback:
Mr. Vinod commented on my exercise 2a.2. He said that the reason why it does not show much of a difference might be because it was not focusing in the middle and I might be using a wide angle to shoot. To prove that aperture does affect depth of field by showing that the background gets blurrier , we should not use a wide angle. We were asked to add in a screen grab of questions and answers from the forum into our blog posts. References can also be added into our blog posts. Mr. Vinod asked me to not only write the exercise number but also label the exercise which I had already corrected.
Reflection:
Experience
Today was our first practical session. After the lecture on aperture, Mr Vinod asked us to take our cameras out and start adjusting the aperture, ISO and shutter speed. First, we shot pictures of Mr. Vinod using from the lowest f-stop to the highest f-stop. At the beginning of the exercise, we struggled a bit on the camera settings and so we had to retake the pictures but slowly we got the hang of it. Secondly, we shot pictures of the railing but this time we changed the f-stops and shutter speed.
It was quite confusing for me to understand how the f-stops works so I had to note everything down then refer back to the notes I wrote during the lecture. I would say it was overwhelming as there were so many things to process on the first practical session for ITP module.
Observation
During the session, I realised that there are many measures taken to take a picture like positioning the tripod, camera settings and lighting. I find the second exercise more challenging because it doesn't show much difference. I also realised that it is harder when you actually apply what you have learn in class into a practical exercise. I observed that each camera has different lowest f-stop and highest f-stop.
Findings
After today's class, I learned that exposure is affected by 3 components: aperture, shutter speed and ISO. Aperture controls the amount (quantity) of light entering the lens. This is controlled by the opening and closing of aperture leaves (diaphragms) to create bigger or smaller holes. It is influenced by f-stops (numbers). A smaller f-stop means overexposure and a bigger f-stop means underexposure. The bigger the f-stop, the smaller the hole and vice versa. I also learned that aperture affects depth of field (clarity of foreground and background). When the foreground and background becomes blur but the subject matter is clear, this means it is a smaller f-stop and bigger hole. The bigger the f-stop is, the wider the depth of field. After doing exercise 2a.2, I realised that there is no obvious differences between the pictures and it might be the angle that I shot at wasn't easy to identify. I understand that we should describe as clear and not sharp when it comes to depth of field.
Before the next lecture, I learned that I must read the slides or reading materials provided by the lecturer on TIMeS so that I would come prepared and roughly know what to expect for the next lecture.

0 comments