
Typography | Week 8 - 10
23/5/2017 Week 8 - 6/6/2017 Week 10
Leanne Faye 0327020
Typography
Project 2 - Font Design

Lectures:
23/5/2017 Week 8
This week was the brief of this project 2. We were asked to look through the list of Adobe Font Folio. Choose something relatively doable and feasible. Download the font and print it out. Study and learn the minor intricacies. Understand anatomies of the chose font. On a A4 graph paper, start by sketching and try out different pen and sketch crucial letters like capitals, small letters or example, "o" or "A". We should explore uppercase, lowercase and punctuation.
30/5/2017 Week 9
This week, there wasn't any lecture. We showed Mr. Vinod and Mr Shamsul our sketches, then proceeded to digitizing the font in Adobe Illustrator. We were expected to finish digitizing and also make sure we had the FontLab Studio software before the next week.
This week, there wasn't any lecture. We showed Mr. Vinod and Mr Shamsul our sketches, then proceeded to digitizing the font in Adobe Illustrator. We were expected to finish digitizing and also make sure we had the FontLab Studio software before the next week.
6/6/2017 Week 10
In this week's class, Mr. Vinod gave a brief lecture on how to use FontLab by demonstrating it to us. Start by merging shapes and outlining strokes, then measure our ascender & descender height and cap height. After that, we need to copy and paste the respective alphabets, numbers and punctuations from AI to FontLab. After that's done, we can start adjusting the kernings by opening window < new metrics window. Then, adjust with the words displaying "the quick brown for jumps over the lazy dog" and moving on to capital letters, numbers and punctuations. Last step is to name the font and generate then print using a PC computer.
13/6/2017 Week 11
This week is the last week to work on this project. We made final adjustments for the kernings and strokes until it was approved. Lastly, naming our font and generate it. We printed it out in the ICT room and showed Mr. Vinod the final piece. For this week's lecture, we attended a talk by a guest speaker, Kek Feng Lee, to hear him share about his experience. He is a graphic designer and an ex-student at MIA (Malaysian Institute of Art). He is from Melaka and he practices Kung Fu when he was younger before an accident happened and he had to stop. Slowly, he began having interest in art and photography and his career developed from there. He is now based in Netherlands and has done many exhibition all around the globe, in places like Taiwan, Hong Kong, London, Paris and many more. Kek feng has worked with so many events like, NEMO Science Museum, Dongseo University (DSU), Holland Japanese Film Festival and many more. Not to mention, he showed us his processes on how he arrived to the final logo design for NEMO Science Museum, from initial skteches to animation and to the application of the logo.
Instructions:
Project 2 (20%)
The Brief
Font Design.
Duration of Assignment
2 Weeks (Briefing on week 8)
Deadline
Week 10 (30 May 2017)
Description
You will be expected to design a font of 27 western alphabets along with punctuation marks. To
begin with choose an existing font design that adheres to the direction that you would like to head
in. Study the font carefully by analysing its anatomical parts.
Identify a Form (Basic shapes i.e., Square, Circle, Triangle) this shall be the starting point of your
designs. You may also choose shapes that you see around you or that you like (i.e. an arrow, a
face, a building, etc). One of these shapes will form the basis of your font design. Your font can be
designed to also fulfill a specific need.
Start with rough sketches and upon approval begin digitization of the drawings—software for
digitization shall be determined in class. Artworks shall be printed out for critique sessions followed
by refinements. If time permits we shall generate the font for actual use.
Requirements
The student must utilise the accumulated knowledge from the exercises, lectures and from their
own reading (library books and online sources) to guide them and inform them in their decisions.
The student must document the process (sketches, trial and errors) in their eporfolio and hardcopy
portfolio. The student will be expected to submit the final mock-up in the hardcopy portfolio and
the softcopy PDF (and or JPEG) uploaded or embedded unto the eportfolio. Create a separate
folder in your Google Drive and store all files, artifacts, project submissions, etc. here.
Ensure all items are logically and chronologically ordered, labelled and dated.
Submission
1. All gathered information (failures, successes, epiphanies, sketches, visual research,
printouts, websites, images, charts, etc.) documented logically and chronologically in the
A4 Clear Sheet hardcopy portfolio. The works labelled and dated.
2. All gathered information (failures, successes, epiphanies, sketches, visual research,
printouts, websites, images, charts, etc.) documented logically and chronologically in the
eportfolio for the duration of the project in one post.
3. Images of all the designed alphabets or glyphs on one A3 printed and uploaded.
4. All the glyphs transferred to the determined software, formatted for the purpose of
generation.
Objectives
1. To develop students ability to construct a readable and legible font.
2. To develop students ability to design a font with consistent characteristics.
3. To allow students to experience the various phases of font design.
Project 2: Font Design
Typeface chosen

Font chosen from Adobe Font Folio - Helvetica Neue Lt Std Med Ext

Anatomy of Helvetica.
Online reference (Source: http://www.appstate.edu/~shugar/helvetica/Helvetica.html)

Classification of Helvetica.
Online reference (Source: http://cargocollective.com/fontsareyourfriends/Helvetica)

Grids showing same squared-rounds and horizontal finials.
Online reference (Source: http://cargocollective.com/fontsareyourfriends/Helvetica)

Grids showing vertical stress of the sides and the horizontal finials.
Online reference (Source: http://cargocollective.com/fontsareyourfriends/Helvetica)

Helvetica in different weights.
Online reference (Source: http://www.thisbloglife.com/2017/02/helvetica-still-pulling-its-weights/)

Seeing the negative space.
Online reference (Source: http://cargocollective.com/fontsareyourfriends/Helvetica)

Helvetica in comparison to Arial.
Online reference (Source: http://lm-burns1114-dp.blogspot.my/2012/11/typography-task-helvetica-vs-optima.html)

Helvetica in comparison to Futura, Franklin Gothic Condensed, Reykjavik,
Clarendon, Platino and Garamond.
Book reference (Source: Krause, J. Visual Design. USA: Pearson. 2015)
Sketches on graph paper

Alphabet A-S, Capital Letters.

Alphabet a-s, Small Letters.

Punctuations & Numbers.
Screenshots of Adobe Illustrator File
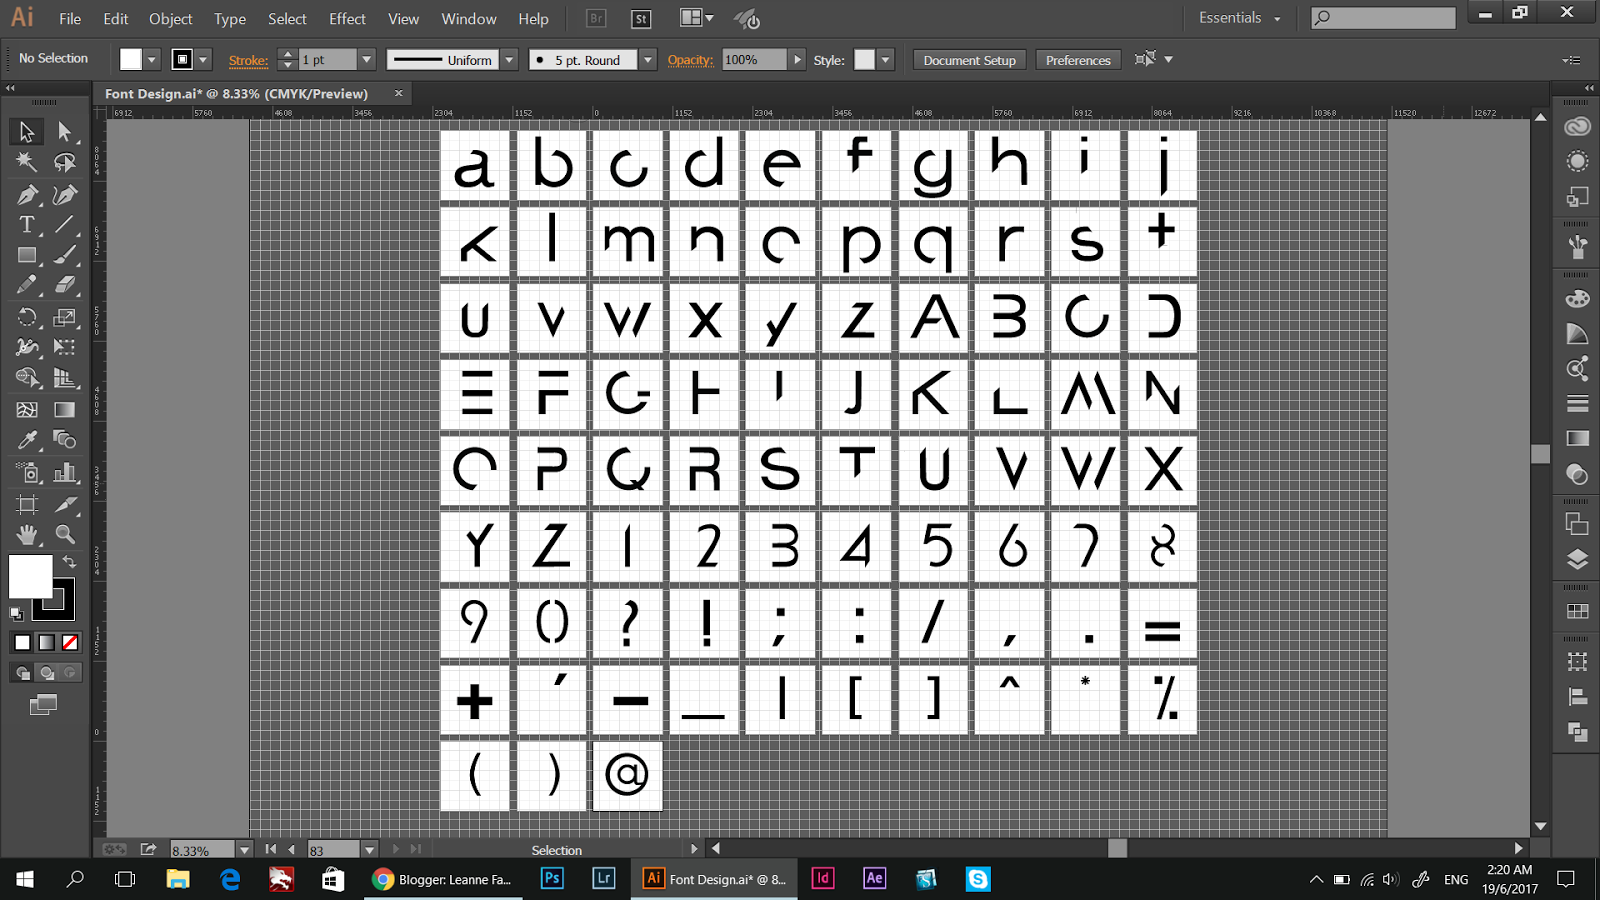
Final Digital Font in Adobe Illustrator

Final Digital Font in Adobe Illustrator (with grids)
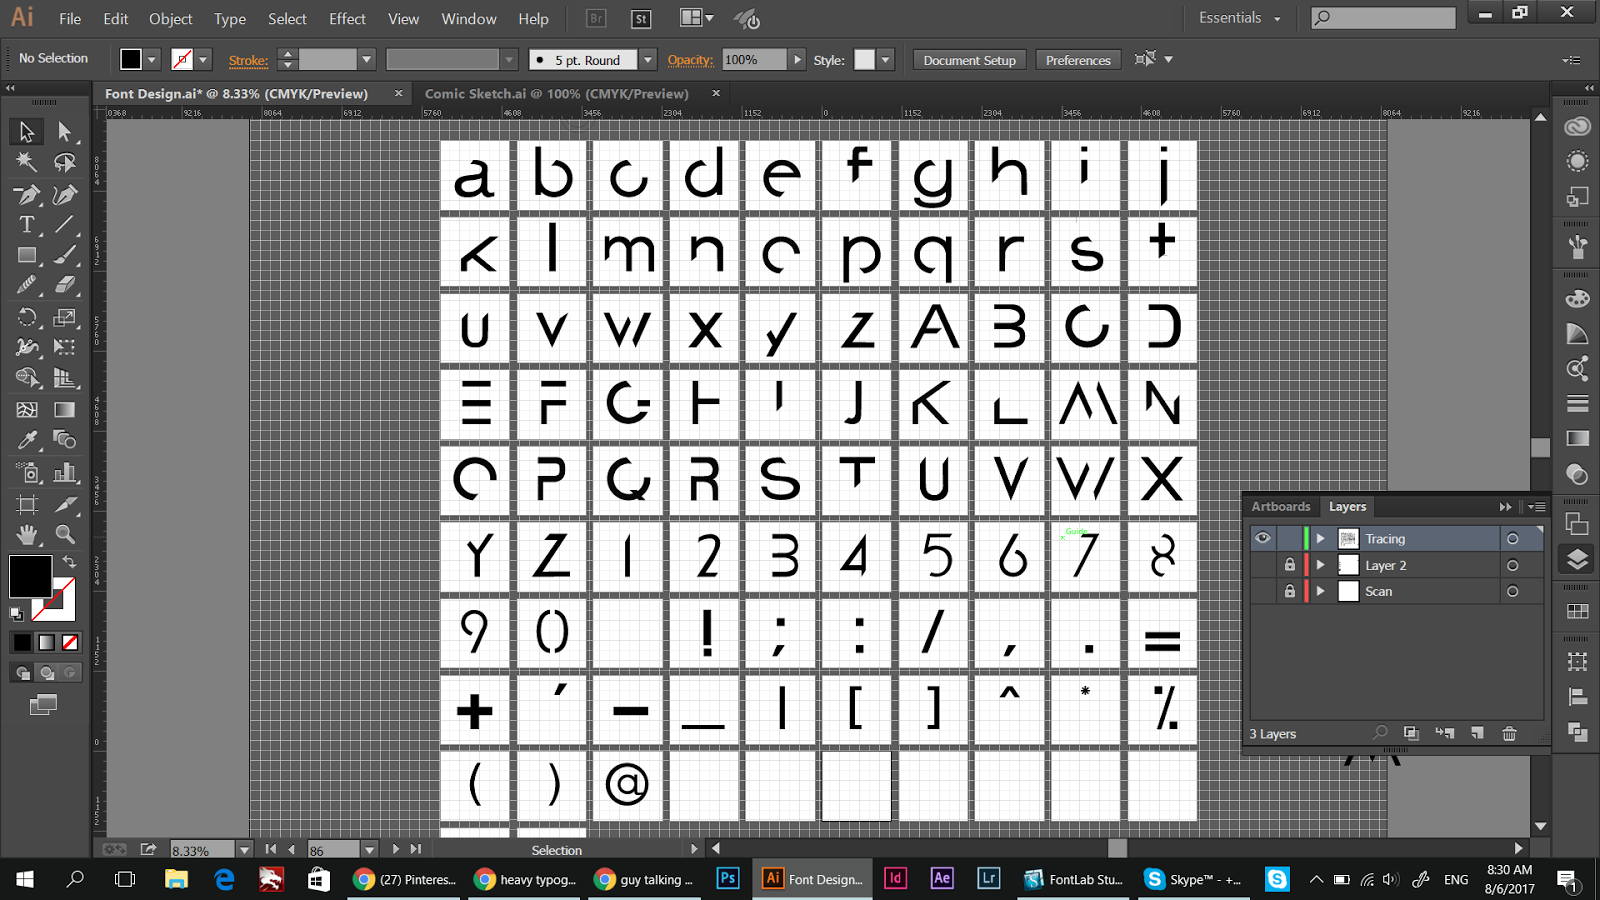
Before receiving feedback for amendments

Initial design of capital letter "M"
(Error because Mr. Vinod said it looks out of place)
Screenshots of FontLab Studio

Digital Font in FontLab Studio
Final Outcome

"Helvete"
Feedback:
30/5/2017 Week 9
Mr. Vinod told me digitize it and also to research on Phil Baines because my font design has some similarities with Baines's font. The choice of font is good.
6/6/2017 Week 10
Small letters 'n' and 'm' were too condensed. Small letter 'a' should be thicker. 'W' looks a bit weird and should be joint instead of separating the strokes. The rest are fine.
13/6/2017 Week 11
13/6/2017 Week 11
The "w" strokes are not all the same, so make amendments to that. Make the last stroke thinner so that it would optically look balanced. Other than that, the rest are good and well-balanced.
Reflection:
Experience
At the start of this project, I started by listing out a few fonts from Adobe Font Folio. I started researching about the few chosen fonts, which are Myriad, Maven Pro, Frutiger and Helvetica. After understanding some basic classification of the four fonts, I decided to go with Helvetica because it's one of the most popular sans serif typeface. Not everyone likes it because it is everywhere you look, in shops signs, clothing label, corporate logo and many other more.
From my research, many fonts are based and derived from Helvetica for different purpose and have clearly different designs. Everyone was modifying Helvetica with funky curls, mixed-case and effects. To understand more about this iconic font, I've decided to choose this typeface.
Helvetica has slipped into the role of "default typeface" for so many printers and signmakers because the nature of the font is clean, meticulous and grid-centric which increases legibility. For this particular reason, it has, sort of, inspired me to design a font proving that we don't need a complete letterform for a letter to be legible.
Second step is sketching, I started by drawing lines and grids on graph paper. We were told to sketch out crucial alphabets like capitals, small letters or example, "o" or "A". We should explore uppercase, lowercase and punctuation. After Mr. Vinod's approval, I started digitizing the font by scanning my sketch into Adobe Illustrator. I dragged grids to indicate the ascender height, cap height, median, baseline and descender height before tracing.
After completing the tracing, I went ahead and transferred it to FontLab Studio. I adjusted the kernings and letterspacing then showed Mr. Vinod for final amendments before generating the font. The whole process of designing a font was not easy at all, from researching about the font to generating the font.
My experience was fairly good and it really taught me the conventions of designing our own typeface. Not to mention, with the help of books from the library and online research that adds on to my knowledge of designing fonts. The hardest obstacle I faced is consistency, because of the nature of my font, it is very geometric so I had to make sure each letter are symmetrical and balanced.
Observation
After this project, I realized that there are so many details to comply with. The gridded construction of Helvetica makes it feel incredibly balanced and even. But Helvetica can't do everything, it can be really weak in small sizes. Shapes like "C" and "S" curls back to themselves, leaving tight apertures.
Like many neo-grotesque designs, Helvetica has narrow apertures, which limit its legibility onscreen and at small print sizes. It also has no visible difference between upper-case 'i' and lower-case 'L', although the number 1 is quite identifiable with its flag at top left.
Findings
During the whole process of this assignment, I did lots of research specifically on the classification of Helvetica. Here are a list of it:
- Tall x-height, which makes it easier to read in smaller sizes and at distance
- quite tight spacing between letters
- An oblique rather than italic style, a common feature of almost all grotesque and neo-grotesque typefaces.
- Narrow t and f.
- Square-looking s.
- Bracketed top flag of 1.
- Rounded off square tail of R.
- Concave curved stem of 7
- Two-storied a (with curves of bowl and of stem), a standard neo-grotesque feature
My font has a x-height of 500pt, ascender height of 695pt, descender height of -164pt and with a cap height of 619 pt. The x-height of my font is specially taller than ascender height and descender height following the original classification of Helvetica. There is an overshoot of the bowl at the baseline and the t and f are relatively narrower then the other letters also following the original classification of Helvetica. I did modification to Helvetica by cutting out parts of counters (from close to open), arms, crossbar and stems. Only small letters a and e have closed counter, the rest are open counter.
Mr. Vinod said my fonts have slight similarity to one of Phil Baines's work and asked the class to research about him. Baines is an author, designer and a lecturer. He is a frequent contributor to the quarterly graphic design magazine Eye. The font is called "FF you can read me", it is a 1995 version of “F Can You (read me)?,” which he designed in 1991 for FUSE 1. According to Baines, “at college in 1983, I had drawn an alphabet based on earlier research by Brian Coe into how much – or how little – of each letter is needed for legibility. My font is strongly inspired by this font created by Baines.
Further references:
Online reading materials
1) Helvetica: still pulling its weights
http://www.thisbloglife.com/2017/02/helvetica-still-pulling-its-weights/
2) Helvetica
http://cargocollective.com/fontsareyourfriends/Helvetica
3) Helvetica 1956
http://www.appstate.edu/~shugar/helvetica/Helvetica.html
4) FF you can read me
https://www.fontfont.com/fonts/you-can-read-me
5) Helvetica Documentary Film 2007
http://www.imdb.com/title/tt0847817/
6) Reputations: Phil Baines
http://www.eyemagazine.com/feature/article/reputations-phil-baines
7) How to design a typeface: A step-by-step guide
http://www.digitalartsonline.co.uk/features/typography/how-design-typeface-step-by-step-guide/
8) Designing a Typeface, With Illustrator and FontLab, from Start to Finish - Part 3
https://design.tutsplus.com/tutorials/designing-a-typeface-with-illustrator-and-fontlab-from-start-to-finish-part-3--vector-3460
9) Myriad Pro
https://www.fonts.com/font/adobe/myriad/story
10) Myriad (typeface)
https://en.wikipedia.org/wiki/Myriad_(typeface)
11) Maven Pro
http://www.losttype.com/font/?name=maven
12) Frutiger (typeface)
https://en.wikipedia.org/wiki/Frutiger_(typeface)
13) Frutiger
http://www.identifont.com/similar?LY
Video materials
1)
Helvetica - Trailer
2)
FontLab - Introduction
Books read throughout the assignment:
1)

Visual Design: Ninety‑five Things You Need to Know.
Told in Helvetica and dingbats.
by Jim Krause
- use grids, frames, symetry, patterns, margins, and textures to create effective layouts
- find the golden ratio and use it to create eye-pleasing patterns and compositions
- establish visual hierarchy in our designs through proper framing, composition, color, spacing, and type
- navigate the color wheel to create and use custom palettes in your designs
- ensure that what we see is really what we get when we print our work
2)

Stop Stealing Sheep & Find Out how Type Works
by Erik Spiekermann
- Type with a purpose. This particular chapter teaches how to match an appropriate typeface with the right task.
- Putting it to work. This chapter teaches simple rules of placement to create practical page layouts and also considering where type is going to live and work will determine its effectiveness.
3)

I Love Bodoni
by Unknown (not stated)
One of my favourite typeface. Bodoni. This book is not relevant to this project but I find this book very interesting which tempted me to borrow it home. I used Bodoni for my last project (Mister Babadook) so this book helped me understand more about Bodoni:
- Designed in 1798 by Giambattista Bodoni
- the serif font Bodoni drew inspiration from elements of the English typeface Baskerville and the French typeface Didot.
- Bodoni has been used in everything from 18th century Italian books to 1960s periodicals, and early versions of the typeface are still used for fine book printing.

0 comments